
 2537
2537
To add CP 12 18 onto a quote or binder (i.e. policy is not yet issued) follow steps below:
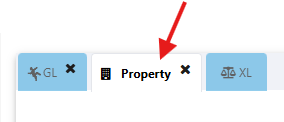
1. Select the Property tab
2. Expand the 'Select Forms' tab

3. Select the 'CP 12 18' form (typically located under Optional Forms)
![]()
4. Select the notepad icon to fill in the form

5. Select the Location-Building No check box, select the Applicable Clause from the drop down and enter the fill in fields for Property Description, Loss Payee Name and Loss Payee Address.
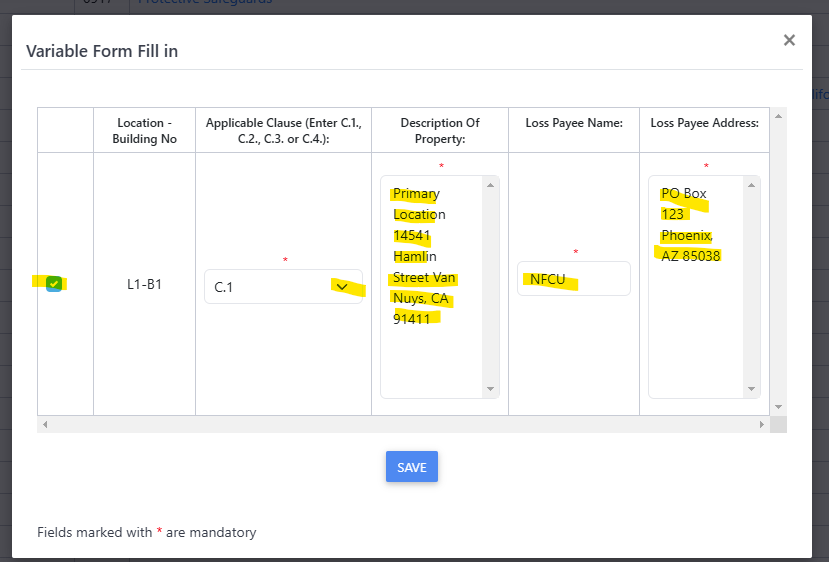
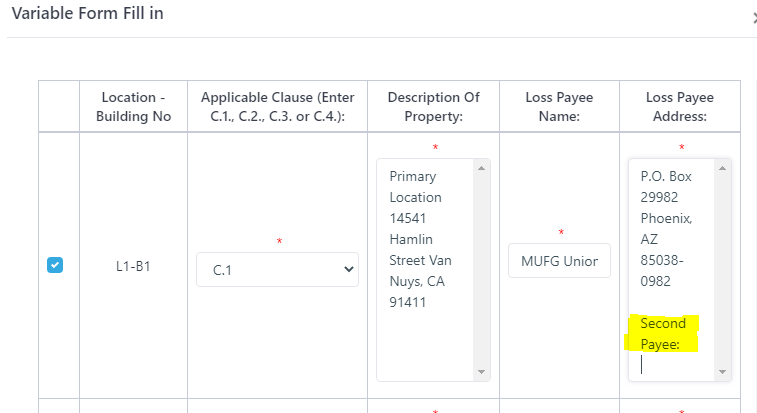
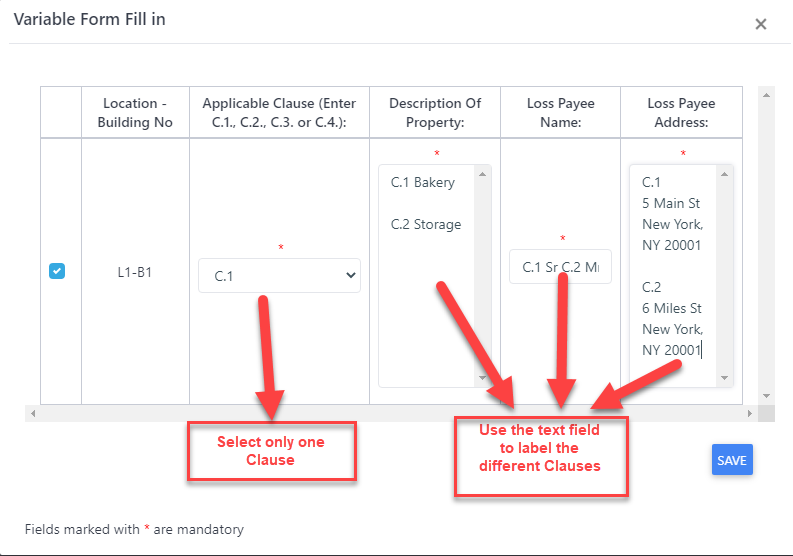
As a note: If multiple loss payees or clauses need to be entered the user should label the first entry (i.e First Loss Payee or C.1 etc), scroll to the end of that initial entry and type the additional entries with further labeling. As a note: Despite how the field appears, it's actually designed to capture entries for more than one loss payee or clause etc, so there is more space than it appears. See examples below.
Example for multiple Loss Payees:
Example for multiple Clauses:
6. Proceed to Quote, Bind and Issy Policy
To add CP 12 18 on an issued policy follow steps below:
1. Create an endorsement and set an effective date
2. Select the Property tab
3. Expand the 'Select Forms' tab
4. Select the 'CP 12 18' form (typically located under Optional Forms), followed by the notepad icon to fill in the form
5. Select the Location-Building No check box, select the Applicable Clause from the drop down and enter the fill in fields for Property Description, Loss Payee Name and Loss Payee Address.
As a note: If multiple loss payees or clauses need to be entered the user should label the first entry (i.e First Loss Payee or C.1 etc), scroll to the end of that initial entry and type the additional entries with further labeling. As a note: Despite how the field appears, it's actually designed to capture entries for more than one loss payee or clause etc, so there is more space than it appears. See examples below.
Example for multiple Loss Payees:
Example for multiple Clauses:
6. Complete Endorsement
To edit CP 12 18 on an issued policy follow steps below:
1. Create an endorsement and set an effective date
2. Navigate to the Issue Tile and select the green notepad next to the CP 12 18 form
- The form window will open, user should select one 'Applicable Clause' and enter information within each field. If multiple loss payees or clauses need to be entered the user should label the first entry (i.e
First Loss Payee or C.1 etc), scroll to the end of that initial entry and type the additional entries with further labeling. As a note: Despite how the field appears, it's actually designed to capture entries for more than one loss payee or clause etc, so there is more space than it appears. See examples below.
Example for multiple Loss Payees:
Example for multiple Clauses:
4. Once details have been entered click on the “Save” button within the form window
5. Proceed with transaction
Here is also a helpful training video:
https://us06web.zoom.us/rec/share/qAipCO2nX44qCElFjMbZdhrAD1qmG_HzGlMqDQFmlG2te0TzyPjWIduVBFQ1S6mj.t92shwnbaVQgy3Ln
Passcode: JHXAA1h&

